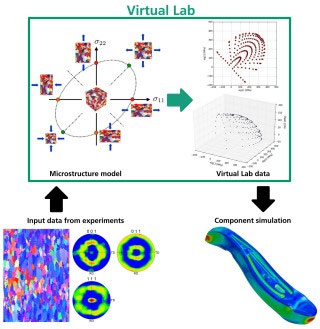
During the forming process, sheet metal materials are often stressed to their limits. Computer simulations are used to test how far it is possible to go in production. However, the simulation is only ever as exact as the data on which it is based. Fraunhofer scientists have now developed a virtual test laboratory that allows them to examine different load states for metal materials and determine precise mechanical data.

The mechanical properties of sheet metal materials are directional: their deformation behavior and their strength differ significantly depending on the viewing direction, for example in the direction of rolling or transversely to it. Numerous complex load tests therefore have to be carried out in order to obtain the necessary material data. These serve as a basis for predicting the behavior of sheet metals during the forming process.
Traditional laboratory tests are time- and cost-intensive, requiring new experimental setups and material samples for each load state. Furthermore, it is not possible to analyze all possible load states of sheet metals, although these are important for computer simulations of the manufacturing process of components. As an example, when it comes to determining the behavior of sheet metal materials in the direction of their thickness, conventional tests reach their limits: the one to two millimeters plate thickness are not sufficient to allow preparation of samples for tensile testing in this direction.
Tensile tests in the direction of plate thickness no problem
“In our virtual laboratory, tensile tests in the direction of plate thickness are no problem, for example,” says Dr. Alexander Butz, project manager in the Forming Processes group at Fraunhofer IWM. “All other load states can also be tested quickly and flexibly. Thus sheet metal forming is able to provide component manufacturers with much more detailed material data.”
To this end, with the help of a few real experiments, Butz and his team first create a simulation model of the material’s microstructure with which the physical mechanisms during deformation are described down to the crystalline structure. This allows them to generate all desired tests in the computer and draw reliable conclusions about the macroscopic mechanical properties of the material. “The method is not new. What is new, though, is that we have developed an automated workflow that saves time by allowing the tests to be run virtually,” Butz explains.
Because it is possible to perform very many virtual tests in a short time and the underlying microstructure model is very exact, the results from the virtual laboratory allow what is known as a material card to be described far more precisely than with traditional tests. The virtually obtained data can be processed by component manufacturers in the same way as data obtained through experiments. In addition to simulations for component production, this also applies to simulations for predicting component behavior and its lifetime in use.
Critical points in the microstructure can be systematically investigated
A further advantage: “Critical points where components are frequently damaged during production can be isolated and the microstructure examined systematically as if with a virtual microscope. We thus gain insights into ways of improving the processing chain,” Butz says.
The virtual test laboratory is especially interesting for the lightweight construction industry because it strives to use as little material as possible – which accordingly is subject to high levels of stress. “Overall, our development is exciting for all those who require very exact input data for process simulation and component design, for example component manufacturers in the automotive and aerospace industries, or in additive manufacturing.”


