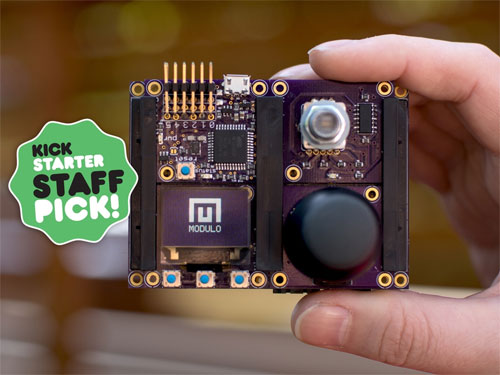
Let’s introduce Module – a set of tiny modular circuit boards that takes the hassle out of building electronics. Now you can create custom electronics for your project without having to design and assemble circuits from scratch!
 Smart Modules
Modulo’s power and flexibility comes from its interchangeable smart modules. Each Modulo has its own little processor to handle its operation and communicate with the controller.
This vastly simplifies the process of building and programming devices, since you only need to deal with high level concepts (ie, Get Temperature or Set Motor Speed) not I/O pin mappings, wiring, data sheets, and registers.
A wide variety of Modulos will be available, starting with workhorse staples such as a Color OLED Display, Push Button Illuminated Knob, and Motor Driver.
Physical Construction
Devices are held firmly by the Modulo Base. In addition to providing physical support, the base electrically connects the devices without the usual tangle of wires. It’s impossible to connect devices incorrectly and the result feels solid and strong in your hand.
Platform Independent
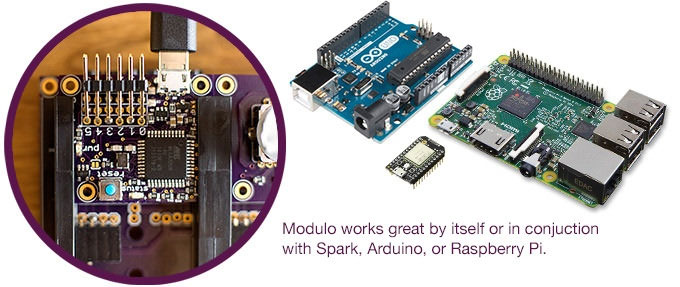
Modulo works great with other platforms. Used by itself, the Modulo Controller is easily programmed with the Arduino IDE. Have a different Arduino in mind? Using Modulo with it will be straightforward too.
The controller can also act as a bridge so you can control Modulos from python running on a computer or Raspberry Pi.
 Base and Spark Base
The Base securely holds four Modulos and connects them together. Need more than four? You can daisy chain Bases for larger projects.
The Spark Base is just like a regular base except it also has a socket for a Spark device. This lets you use a Core, Photon, or Electron instead of the Modulo Controller. In true Modulo fashion, there’s still no wiring or soldering required.
Meet the Modulos
The Controller
The Controller is an Arduino compatible microcontroller (ATmega32u4) on a Modulo. When used with a Mac, Windows, or Linux computer you can control all of your Modulos using python over USB. You can also use the Arduino app to reprogram the controller, creating standalone projects.
The controller also has 6 I/O ports that can be used as digital inputs, digital outputs, or analog inputs. Each port has its own power and ground pins to help keep wiring tidy, and circuitry on the controller protects it from damage if you hook something up wrong. Four of the six ports can also be used to control servos or output a PWM (analog-ish) signal.
The Display
This clear, crisp, color OLED display is great for presenting information at a glance. Displaying text, graphs, and gauges has never been easier. Three buttons below the display are perfect for navigating on screen interfaces.
The display has its own speedy processor that handles all the drawing operations, freeing up your computer or microcontroller for other tasks.
The Knob
The Knob precisely reports how far you have turned it in either direction. It also has a built-in RGB led and push button, so you can set its color and sense when it’s pressed. This Knob is rockin’, so go ahead and crank it to 11!
The Joystick
This thumb joystick is great for controlling a robot or building your own game controller. Like the knob, it can also detect when it’s pressed.
The Motor Driver
Controlling the speed and direction of motors is a breeze with the motor driver. It can power two DC motors, one stepper motor, or four solenoids. With the power supply input disconnected, the Motor Driver will use the 5V supply from the Base. You can also attach a higher voltage DC power source (up to 24V!) if your motors need it.
The Temperature Probe
The Temperature Probe is an accurate, waterproof temperature sensor that connects directly to the extension port on the Modulo base.
Unlike other Modulos, it doesn’t take up its own slot. Unlike other temperature sensors it accurately reports temperature in degrees and doesn’t require any other components.
Cables
Modulo has two types of cables. The I/O cable has three wires for breaking out one of the Controller’s I/O pins along with power and ground. The extension cable has four wires and is designed for connecting bases together.
Manufacturing
Modulo devices will be manufactured in Northern California, less than an hour’s drive from Modulo HQ. Manufacturing here makes the project more likely to succeed since it eliminates Travel, Tariffs, Timezones and Translation.
What can you do with it?
Check out these great projects:


Enclosures
We know you want your project to not just work well, but look amazing too. So we’ve designed beautiful enclosures that you can download for free and print on any 3d printer.
Each enclosure attaches to a single Modulo. Once Modulos are attached to a base, the entire project is enclosed.
Why aren’t we including enclosures as part of the kickstarter rewards? Injection molding is a huge undertaking that could significantly delay or risk the success of the entire project. We want to get hardware into your hands as quickly as possible, so we’re starting with bare circuit boards.
Open Source
Modulo couldn’t exist without the amazing work of the open source community, and it won’t exist without your generous support. We want to give back, so we plan to make the hardware, software, and firmware all open and available for you to use and modify. We’ll also provide eagle CAD files and firmware that you can use to create Modulos of your own design.
Communication Protocol
Modulos communicate using the industry standard I2C bus. On top of that, we’ve added some really great features. You don’t have to know any of this to use Modulo, but we’re really proud of it and we like to share!
First, each device has a unique ID and can be discovered by the controller. This means you can connect as many of the same devices as you want and you never worry about soldering address jumpers like with traditional I2C devices.
Second, we have a clever event mechanism that lets devices notify the controller when changes occur. This means you’re sure to catch button presses or other events and you never have to poll.
Finally, we’ve added error checking mechanisms to protect your data from electrical noise and interference.
If the kickstarter campaign is successful, we’ll publish the details of the Modulo protocol in an open document.
Risks and challenges
Manufacturing and shipping products comes with its own set of unique challenges. For instance, we need to make sure Modulo devices can be manufactured efficiently and reliably. Unexpected changes in component lead times could also put us behind schedule, and mistakes could result in both delays and cost overruns.
Fortunately, Modulo does not require the long lead times and high tooling costs associated with manufacturing injection molded parts. We also have experienced people to help us out, with a manufacturing partner who has been in the electronics business for over 20 years.
In the unlikely event that we do run into major problems we will do our best to make some compromises and still deliver Modulo. For instance, we might eliminate one of the Modulos to reduce costs, rather than giving up entirely. That said, we have done our homework and feel very confident that we will be able to deliver Modulo as described and promised.


