
 In the world of Internet of Things (IoT) when we have all the technologies to revolutionize our life, it’s a great idea to develop a system which can be controlled and monitored from anywhere. There are many types of good security systems and cameras out there for home security but they are much expensive so today we will build a low cost simple Raspberry Pi based Intruder Alert System, which not only alert you through an email but also sends the picture of Intruder when it detects any.
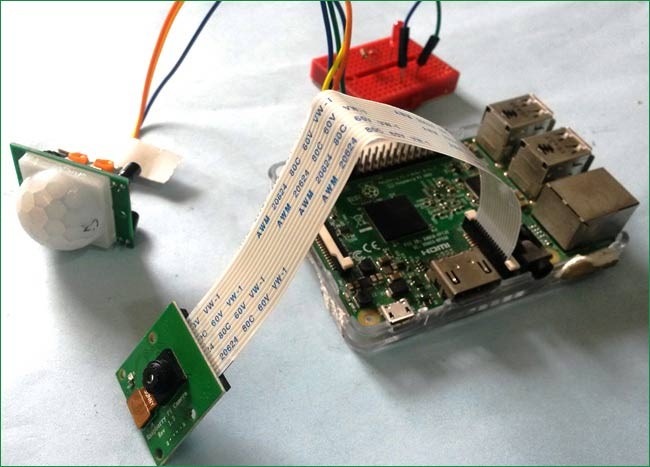
In this IoT based Project, we will build a Home Security System using PIR Sensor and PI Camera. This system will detect the presence of Intruder and quickly alert the user by sending him an alert mail. This mail will also contain the Picture of the Intruder, captured by Pi camera. Raspberry Pi is used to control the whole system. This system can be installed at the main door of your home or office and you can monitor it from anywhere in the world using your Email over internet.
Components Required:
- Raspberry Pi
- Pi Camera
- PIR Sensor
- LED
- Bread Board
- Resistor (1k)
- Connecting wires
- Power supply
Working Explanation:
Working of this Project is very simple. A PIR sensor is used to detect the presence of any person and a Pi Camera is used to capture the images when the presence it detected.
Whenever anyone or intruder comes in range of PIR sensor, PIR Sensor triggers the Pi Camera through Raspberry Pi. Raspberry pi sends commands to Pi camera to click the picture and save it. After it, Raspberry Pi creates a mail and sends it to the defined mail address with recently clicked images. The mail contains a message and picture of intruder as attachment. Here we have used the message “Please find the attachment”, you can change it accordingly in the Code given at the end.
Here the pictures are saved in Raspberry Pi with the name which itself contains the time and date of entry. So that we can check the time and date of intruder entry by just looking at the Picture name, check the images below. If you are new with Pi Camera then check our previous tutorial on Visitor Monitoring System with Pi Camera.
You can also adjust the detection range or distance of this system using PIR sensor’s potentiometers. Learn more about PIR sensor here to adjust the range also check PIR sensor based Burglar alarm.
 Circuit Description:

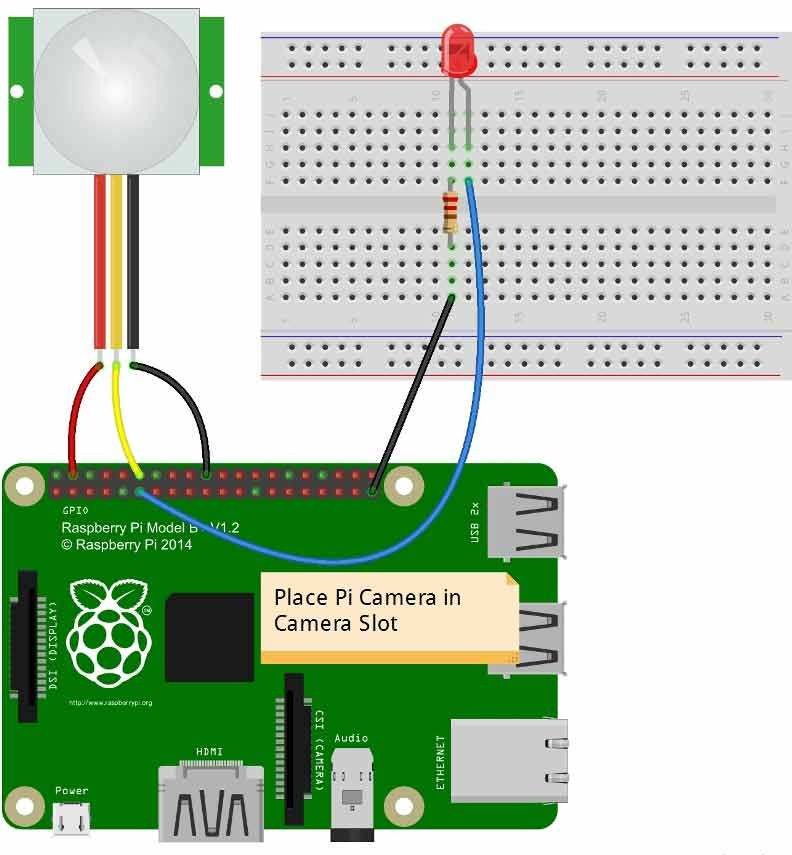
In this Intruder Alert System, we only need to connect Pi Camera module and PIR sensor to Raspberry Pi 3. Pi Camera is connected at the camera slot of the Raspberry Pi and PIR is connected to GPIO pin 18. A LED is also connected to GPIO pin 17 through a 1k resistor.
Raspberry Pi Configuration and Programming Explanation:
We are using Python language here for the Program. Before coding, user needs to configure Raspberry Pi. You should below two tutorials for Getting Started with Raspberry Pi and Installing & Configuring Raspbian Jessie OS in Pi:
- Getting Started with Raspberry Pi – Introduction
- Getting Started with Raspberry Pi – Configuration
After successfully installing Raspbian OS on Raspberry Pi, we need to install Pi camera library filesfor run this project in Raspberry pi. To do this we need to follow given commands.
After it, user needs to enable Raspberry Pi Camera by using Raspberry Pi Software Configuration Tool (raspi-config)
Then user needs to reboot Raspberry Pi, by issuing sudo reboot, so that new setting can take. Now your Pi camera is ready to use.
Now after setting up the Pi Camera, we will install software for sending the mail. Here we are using ssmtp which is an easy and good solution for sending mail using command line or using Python Script. We need to install two Libraries for sending mails using SMTP.
After installing libraries, user needs to open ssmtp.conf file and edit this configuration file as shown in the Picture below and then save the file. To save and exit the file, Press ‘CTRL+x’, then ‘y’ and then press ‘enter.
We can also test it by sending a test mail by issuing below command, you shall get the mail on the mentioned email address if everything is working fine:
The Python Program of this project plays a very important role to perform all the operations. First of all, we include required libraries for email, initialize variables and define pins for PIR, LED and other components. For sending simple email, smtplib is enough but if you want to send mail in cleaner way with subject line, attachment etc. then you need to use MIME (Multipurpose Internet Mail Extensions).
And now in last, we have read PIR sensor output and when its goes high Raspberry Pi calls the capture_image() function to capture the image of intruder and send a alert message with the picture of intruder as an attachment. We have used sendmail() insdie capture_image() function for sending the mail.
So this how this Raspberry Pi Security System works, you can also use Ultrasonic sensor or IR sensor to detect the presence of burglar or intruder. Further check the Full Code and demonstration Video below.
Code:
import RPi.GPIO as gpio
import picamera
import time
import smtplib
from email.MIMEMultipart import MIMEMultipart
from email.MIMEText import MIMEText
from email.MIMEBase import MIMEBase
from email import encoders
from email.mime.image import MIMEImage
fromaddr = “raspiduino4201@gmail.com” # change the email address accordingly
toaddr = “saddam4201@gmail.com”
mail = MIMEMultipart()
mail[‘From’] = fromaddr
mail[‘To’] = toaddr
mail[‘Subject’] = “Attachment”
body = “Please find the attachment”
led=17
pir=18
HIGH=1
LOW=0
gpio.setwarnings(False)
gpio.setmode(gpio.BCM)
gpio.setup(led, gpio.OUT) # initialize GPIO Pin as outputs
gpio.setup(pir, gpio.IN) # initialize GPIO Pin as input
data=””
def sendMail(data):
mail.attach(MIMEText(body, ‘plain’))
print data
dat=’%s.jpg’%data
print dat
attachment = open(dat, ‘rb’)
image=MIMEImage(attachment.read())
attachment.close()
mail.attach(image)
server = smtplib.SMTP(‘smtp.gmail.com’, 587)
server.starttls()
server.login(fromaddr, “your password”)
text = mail.as_string()
server.sendmail(fromaddr, toaddr, text)
server.quit()
def capture_image():
data= time.strftime(“%d_%b_%Y|%H:%M:%S”)
camera.start_preview()
time.sleep(5)
print data
camera.capture(‘%s.jpg’%data)
camera.stop_preview()
time.sleep(1)
sendMail(data)
gpio.output(led , 0)
camera = picamera.PiCamera()
camera.rotation=180
camera.awb_mode= ‘auto’
camera.brightness=55
while 1:
if gpio.input(pir)==1:
gpio.output(led, HIGH)
capture_image()
while(gpio.input(pir)==1):
time.sleep(1)
else:
gpio.output(led, LOW)
time.sleep(0.01)


