![]() The constant change in the position of the sun throughout the year has posed quite a big challenge for us as far as solar power harnessing is concerned. A solar tracker is a device for orienting a solar photovoltaic panel, day lighting reflector or concentrating solar reflector or lens toward the sun. Solar power generation works best when pointed directly at the sun, so a solar tracker can increase the effectiveness of such equipment over any fixed position. The solar panels must be perpendicular to the sun’s rays for maximum energy generation.
The constant change in the position of the sun throughout the year has posed quite a big challenge for us as far as solar power harnessing is concerned. A solar tracker is a device for orienting a solar photovoltaic panel, day lighting reflector or concentrating solar reflector or lens toward the sun. Solar power generation works best when pointed directly at the sun, so a solar tracker can increase the effectiveness of such equipment over any fixed position. The solar panels must be perpendicular to the sun’s rays for maximum energy generation.
The objective of this project is to generate maximum power by tracking the Sun throughout the day. The solar tracker tracks the sun from East to West throughout the day. More energy is collected by monitoring the solar panel to track the sun like a sunflower. The solar tracking system is a mechatronic system that integrates electrical and mechanical systems, and computer hardware and software.
TECHNOLOGY TO ENHANCE POWER OUTPUT FROM SOLAR PANEL
Increasing the cell efficiency, maximizing the power output and employing a tracking system with solar panel are three ways to increase the overall efficiency of the solar panel. Improvement of solar cell efficiency is an ongoing research work and people throughout the world are actively doing research on this. Maximizing the output power from solar panel and integrating solar tracking system are the two ways where electronic design methodology can bring success.
Maximum power point tracking (MPPT) is the process to maximize the output power from solar panel by keeping the solar panel’s operation on the knee point of P-V Characteristics. A number of MPPT algorithms have been developed and employed around the world. MPPT technology only offers the maximum power that can be received from a stationary array of solar panels at a particular time; it cannot, however, increase the power generation when the sun is not aligned with the system.
Automatic solar tracker increases the efficiency of the solar panel by keeping the solar panel aligned with the rotating sun. Solar tracking is a mechanized system to track the sun’s position that increases power output of solar panel 30% to 60% than the stationary system. A few design methodology of solar tracking system has been proposed in recent days. From these literatures it is evident that sensing of sun light, providing initial position of the solar panel and power consumption of the motor for the tracker are the major challenges of the solar tracking system.
Diffused reflection is another means to increase the efficiency of the solar panel. Maximum rays from the sun reach on the earth’s surface through interaction of clouds, dusts and water. These rays are called diffused rays, which reduce the output of solar cell. If diffused rays are reflected
on the panel through the reflectors it will increase the overall output of the panel.
Prototype of Automatic Solar Tracker
Development of solar panel tracking system has been ongoing for several years. As the sun moves across the sky during the day, it is advantageous to have the solar panels track the location of the sun, such that the panels are always perpendicular with the position of the sun. Available solar trackers in the market are much costly to integrate with solar panel system. The major components those are used in the prototype are given below:-
- Photo resistor
- Microcontroller
- Stepper motor
Below figure shows the model of the solar tracker prototype. As illustrated the solar tracker prototype accommodates both degrees of freedom: azimuth and vertical. Note that two LDR sensors module and thus same control algorithm are implemented in both degrees of freedom.
![]() For the each of axis, use two sensor modules. The sensor module which used to vertical axis should be normal to motor of vertical axis. Then that motor can align the vertical axis with sun.
For the each of axis, use two sensor modules. The sensor module which used to vertical axis should be normal to motor of vertical axis. Then that motor can align the vertical axis with sun.
In this prototype another axis is azimuth. Then the sensor module which used to azimuth axis should be normal to another sensor module. Then the motor belongs to that axis can align azimuth axis with sun.
When we use two sensors, we have to install separately. Therefore these can integrate in to one sensor which can align two axes with sun.
The Materials used in the construction of the prototype include Perspex 2mm sheets. The vertical axis was constructed by using Perspex sheets and motor connected to the panel as above figure shows.
Solar Tracker Control Circuit
Solar tracker control circuit consist power supply, two motor drivers and micro-controller(16f877A).
![]() Above shows the schematic for the solar tracker control circuit. A voltage supply of 12V is applied to the circuit which is then passed through a 5V voltage regulator. The regulated voltage is then supplied to the PIC.
Above shows the schematic for the solar tracker control circuit. A voltage supply of 12V is applied to the circuit which is then passed through a 5V voltage regulator. The regulated voltage is then supplied to the PIC.
Notice that the four Analogue pins are connected to port RA0 to RA3 of the PIC from the sensor modules. The output which drives the motor is obtained from two PWM pins RC1 and RC2, and direction controlling from RC0, RC3 for motor1 and RC4, RC5 for motor2. MCLR reset input port is also connected to 5V supply via 10k resistor. In order to supply power to the PIN11, PIN 32 is set to positive 5V and the PIN12, PIN 33 is set to ground. 4MHz crystal is connected to PIN12 and PIN13.
Sensor
The most important part in this project is select suitable sensor for detect the maximum light intensity position. Then the below sensor which have two LDRs is so easy to make and find maximum light intensity position.
![]() The resistance of LDR is inversely proportional to the light intensity. It is difficult to measure the light intensity by resistance of LDR. Therefore we convert resistance in to voltage signal where voltage signal is proportional to the light intensity. For that LDR is placed with resister
The resistance of LDR is inversely proportional to the light intensity. It is difficult to measure the light intensity by resistance of LDR. Therefore we convert resistance in to voltage signal where voltage signal is proportional to the light intensity. For that LDR is placed with resister
in series. The 5V is supplied to LDR and ground the remaining end of resister as above figure.
The voltage signal father convert to digital value using ADC module of microcontroller.
The sensor has object between to LDRs. When sensor is normal to the sun, there is no shadow of object on the LDRs. Then, the light intensity which on the LDRs is same. Therefore digital values are also same. If sensor is not normal to the sun, there should be shadow of object on one of the LDRs. Then the digital value of the LDR which get dark is less than the digital value of another LDR. Therefore this sensor can find the position of sun.
Operation of the solar tracker program
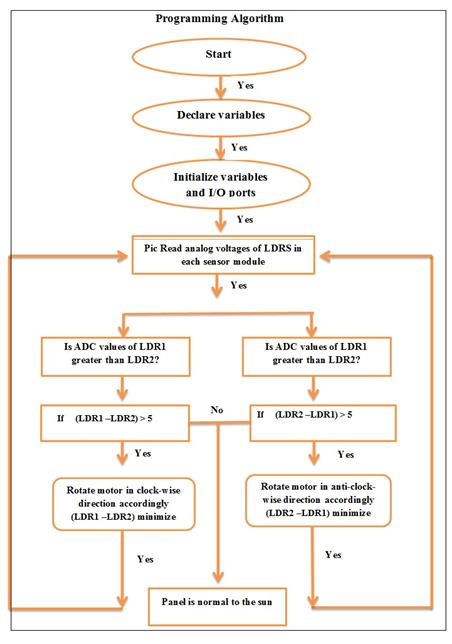
The operation of the solar tracker is easy to understand, it works by using a PIC16F877A which compares the ADC values which proportional to light intensity illuminated onto the LDRs in each sensor module. PIC16F877A have ADC modules to get digital values. Each LDR have bridge circuit produce analog voltage which proportional to light intensity. That analog voltage connected to the ADC module of Microcontroller. The logic that works on the Microcontroller to get the analog values as inputs and compare two analogue values form LDRs belongs to each sensor and find which LDR is under shadow. Then rotate motors which belongs to each sensor until minimize the difference between two ADC values with an error margin of ±5 points. Simultaneously two motors are rotate according to minimize the difference between two ADC values.
![]() Whereas in the above figure, if one of the sensors comes under a shadow, then the PIC will detect this change through ADC values and thus it will actuate the motor to move the sensor module to a position where equal light is being illuminated on both of them.
Whereas in the above figure, if one of the sensors comes under a shadow, then the PIC will detect this change through ADC values and thus it will actuate the motor to move the sensor module to a position where equal light is being illuminated on both of them.
The PIC is programmed so that it can obtain analog voltages which proportional to light intensity from the each bridge circuit of LDRs and to move motor either clock wise or anti clock wise depending on which LDR is under shadow. The basic concept of the software design is illustrated in the below flowchart.
Programming Algorithm
 NI LabVIEW Software to design Low-Cost, Energy-Saving Solar Tracker
Case Study
“LabVIEW graphical system design was the best choice for this project, as it enabled my students to design and prototype a fully-functional two-axis solar tracker system in only 13 weeks. They were able to spend more time focusing on their design, and less time learning low-level programming syntax.”
– Alex See, PhD, Monash University Malaysia School of Engineering and Science
The Challenge:
Completing a mechatronic project to design, develop, and test a prototype solar tracker.
The Solution:
Using NI LabVIEW and the NI PCI-7334 motion controller device to prototype a solar tracking system comprised of two plane-parallel solar panels.
Designing an Efficient Solar Energy Solution
![]() Satellite and space travel technology has resulted in solar cells converting solar radiation into electrical energy. Solar panels are useful in practical applications, such as thermal energy storage systems, electric power generating systems, and the aerospace industry. But the average solar energy intercepted by a conventional stationary solar panel is not fully optimized during the day due to static position and placement, which can hide it from sun exposure.
Satellite and space travel technology has resulted in solar cells converting solar radiation into electrical energy. Solar panels are useful in practical applications, such as thermal energy storage systems, electric power generating systems, and the aerospace industry. But the average solar energy intercepted by a conventional stationary solar panel is not fully optimized during the day due to static position and placement, which can hide it from sun exposure.
Although sun tracker systems are available commercially, they can be quite costly, depending on their tracking sophistication level. To create a less-costly alternative, a group of students designed and prototyped a real-time solar tracking system comprised of two plane-parallel solar panels.
Flexible, Easy-to-Use Products Offer Short Learning Curve
For this project, we chose to use the NI LabVIEW graphical development software and the NI PCI-7334 motion controller card to control a two-axis stepper motor system. We chose LabVIEW as our software development environment for several reasons. First of all, LabVIEW includes graphical function blocks for programming rather than lines of text, which makes it easier to use. Because of this, the LabVIEW learning period is substantially shorter; however, students are still learning the basics of programming and software engineering principals. LabVIEW also comes with extensive documentation and a large number of built-in math, analysis, and signal processing functions.
The students spent about four weeks designing the prototype solar tracker using AutoCAD software, and about two weeks designing and constructing the photodiode sensing circuits. They spent the remaining seven weeks designing their software, debugging, and testing.
Students Optimize Resources to Create Highly Capable System
We used a low-cost PCI-7334 motion controller card designed for stepper motor control applications with as many as four axes. For this project, the students used only two axes and programmed the stepper motor motion using LabVIEW. A UMI-7764 interconnected to third-party stepper motor power drivers provides a comprehensive wiring and connection point for motion control and feedback signals. A single cable from the motion controller to the UMI-7764 carried all the input and output signals for all four axes. The four-quadrature analog inputs (i.e., 0 to 5 VDC) on the UMI-7764 accept the four current-to-voltage sensing circuit outputs.
The solar tracker system prototype includes two solar panels and two VEXTA CSK series two-phase stepper motors and drivers for horizontal and vertical movement. The students configured the clockwise stepper motor outputs with an angular resolution of 1.8 degrees, requiring 200 steps to complete a revolution. Students placed photodiodes, which are used as light sensors, in a special pyramid shape mounted onto a flat perspex sheet. The photodiodes were positioned such that the opposite pairs tracked both the horizontal and vertical light source positions. The photodiodes produced a current proportional to the light intensity received from an external source (a table lamp), and the voltage from the sensing circuit increased or decreased accordingly. The four-voltage signals from the four sensing circuit outputs connected to the four-quadrature UMI-7764 inputs.
The light-sensing circuit was an I-to-V converter using a low-power LM158 operational amplifier. The different voltage signals were passed into LabVIEW and were used to command the stepper motor movement.
Successfully Tracking the Light Source Position
By developing a simple LabVIEW program, the students turned the stepper motor and later reset the target stepper motor position. For exploring target position, velocity, and acceleration, they wrote a program for acquiring analog voltage values from the I-to-V photodiode/op-amp sensing circuits. After testing, the program successfully demonstrated that the solar tracker was able to track the maximum light source intensity. The tracking resolution was actually the stepper motor resolution, which, in this case, was 1.8 degrees for both the horizontal and vertical positions.
The students designed their software flow chart based on the following information:
- This LabVIEW program read in four analog voltage values from the four individual photodiode-operational amplifier sensing circuit outputs via the four UMI-7764 analog input channels.
- The software compared voltage readings for the two pairs of sensors. The vertical opposite sensors performed vertical plane tracking, and the horizontal opposite sensors performed horizontal plane tracking.
- If the pair values differed from one another, the LabVIEW program generated commands to turn the stepper motor one step (i.e., 1.8 degrees) at a time, until voltage readings were the same in each pair. After achieving equilibrium, the solar panels aligned toward the direction of maximum light intensity.
Using a separate PCI-6036E DAQ board and another LabVIEW program, the students acquired the connected solar panels series open-circuit voltages. Until 8 s had passed, the solar tracker was at rest, as the light was turned off. But after 9 s, the students turned on the table lamp, which was positioned about 50 cm away from the system. The solar tracker started to respond due to the sudden strong light intensity, resulting from the increasing open-circuit solar panel voltage. The tracker continued to track both the vertical and horizontal stationary light source positions and maintained a steady condition after about 25 s.
Design, Test, and Development in a Short Amount of Time
It is important to teach engineering students how to design a mechatronic system, which includes mechanical, electrical, and software design. In order for students to design a complete system from start to finish in one semester, a high-level software tool that easily integrates with low-cost hardware is required. LabVIEW graphical system design was the best choice for this project, as it enabled my students to design and prototype a fully-functional two-axis solar tracker system in only 13 weeks. The students commented that they enjoyed their experience with LabVIEW, and were able to quicky get started on their project through helpful documentation and examples that were clear and easy to follow. With LabVIEW, they were able to spend more time focusing on their design, and less time learning low-level programming syntaxes.


